
Toy car for my nephew
A robotic car may be a bit advanced for a two-year-old, but it is what I did anyway. This car can drive forward and backward, steer and detect obstacles and has working lights.
This project has so many aspects that there is one article for each:
Car in use – videos!
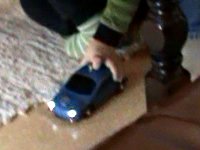
Here are two videos of the car in action. First one is on the technical details and the second one has my nephew playing with it.
Carving the car body
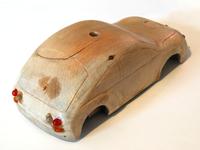
The body was the most laborous part to make. You want a toy to be durable, but metal is difficult to work with hand tools. I ended up using some block of hard wood I had lying around. I don't know from exactly which tree it is from, but it is hard.
Designing the steering mechanism
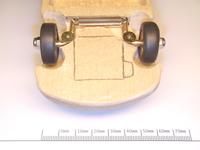
The toy car has a real steering mechanism, controlled by a servomotor. The metal parts are made of 4 mm brass rod using hand tools for shaping and Dremel for drilling. Most important factor was the strength against upward force, which occurs when pressing the car against the floor while playing.
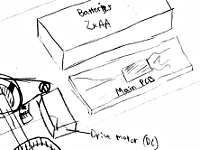
Three different drive mechanisms

The toy doesn't need much power to move, but it needed a transmission to adapt the speed of the motor to the speed of the wheels. Furthermore, the drive mechanism should give way if someone chooses to play with the toy in an old-school fashion, pushing it around on the floor.
Control electronics
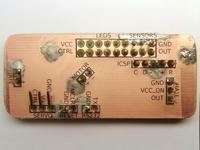
I'm starting to get a bit fond of the PIC16F689 microcontroller; it is small enough, has internal oscillator and good enough peripherals. Another nice chip I used for the car electronics is LB1838 motor controller from an old floppy drive. It has two integrated H-bridges and logic level control signals.
Software logic
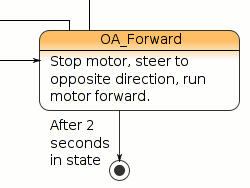
There is strange thing about software in embedded systems: it is always the easy thing until you actually have to start writing it. This time it was a lot easier than usual, because of two reasons: 1) I used C instead of ASM, even though PIC is not very well suited for it, and 2) I was able to make hardware modifications after starting with the software.
Original plans
For the fun of it, here are the original plans for the car. This is all I had drawn before I built it, all the other images and plans have been drawn afterwards. A product of one night when I couldn't get sleep...
Mandatory "after" photos
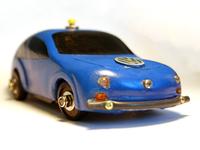
To finish off with, here are five photos of the end result from angles that I haven't shown yet.