
Carving the car body
The body was the most laborous part to make. You want a toy to be durable, but metal is difficult to work with hand tools. I ended up using some block of hard wood I had lying around. I don't know from exactly which tree it is from, but it is hard.
The thinnest part of the body is between the windshield and the hole for main PCB. The wood is about 5 mm thick there. It is quite strong anyway, because it forms a corner and the tension is along the wood grain.
Tooling

The basic form was easy to make, using a saw and a table top belt sander. The rest, on the other hand, required hours after hours routing and shaping with Dremel. Converting 200 cm³ of wood into fine dust takes time! The wood was so hard that removing larger chunks didn't work too well, and it made really fine dust when shaped with Dremel.

To make the cavities in the wood, I first drilled 3 mm holes as close to each other as I could. The depth limiter on my Dremel stand was a great help, because it made possible to drill to exactly the right depth.
After drilling, I used a chisel and a screw driver to remove whatever chunks of wood I could. The bits that wouldn't come off with a chisel, I removed with Dremel 115 cutter. Finally, I leveled the floor of the hole with chisel and sharpened the inner corners with a utility knife.

Routing flat surfaces along the grain turned out to be easy. The cutter guided itself and the hole sides ended up perfectly planar. In contrast, when I tried to carve a slanted hole for the worm-gear drive, the result was horrible. Because the hole bottom was not straight, I couldn't mount the motor accurately and the gear drive did not work. Similar problems emerged with the fenders, but they were accessible from the sides. Therefore I was able to use a sander band bit to smooth them up.
A minor detail in the fenders is that they actually have a groove on the inside where the wheel spins. It was simple to make by cutting part of the sander belt on the Dremel bit away so that it is the same width as the wheels.
Lamps

 Paint covers the lamp mounting holes.
The lamps were tricky to mount. There was little space for the holes, so my first idea about soldering the resistors directly to the LEDs did not work. Instead, I carved a separate hole for the resistors underneath the servo in the front and between the taillights in the back.
Without the resistors the LEDs were easy to push into place. You can use some oil to help the shrink-wrap protected wires slide against the wood. The leds are glued to the body and connected to the main board with a ribbon cable.
 Wires go both ways from the LED connector.
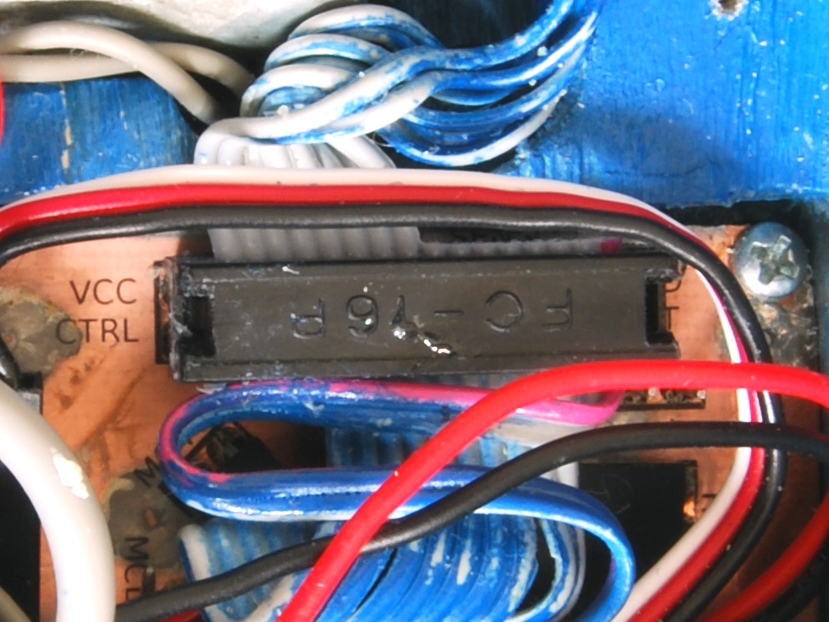
Electrically, the paired LEDs (two headlights, two taillights, two pairs of turn signals) are connected in parallel with a resistor for each LED. Because every LED has an own resistor, I couldn't mount the resistors on the PCB. Instead, I had to solder them to the wires separately.
There is a little trick in the ribbon cable: the wires for the turn signals continue to both directions around the IDC connector, whereas the rest of the wires go to either front or back.
The LEDs are just cheap ordinary ones, except for the headlights and reversing lamps which are bright white ones. I cut away the ridge on the LEDs with a file to allow for smaller holes. You can shape LEDs quite freely as long as you don't damage the chip. I also shaped the turn signals flat, because I happened to only have round orange LEDs. The turn signal LEDs were also a bit disappointing, as they look more red than orange or amber as they should be. Apparently some orange LEDs are actually red even if the plastic is orange.
The phototransistors for obstacle detection are mounted in exactly the same way as the LEDs. There are a total of three phototransistors: one in the front and two underneath.
Originally the sensors underneath were supposed to follow lines, but it turned out to not work too well. As it is, they just detect when the car is lifted up. The front sensor is used for obstacle detection. All sensors work by detecting the reflection of modulated light from the headlights or the infrared LED mounted underneath the car.
Surface work

I smoothed the surface by sanding with 100 grit sanding sponge. After that, I carved grooves where the windows, doors and hood would be. I didn't have any primer paint for wood, so I covered it with a few layers of thinned acrylic lacquer.
The point with the lacquer was to make the surface harder, which it definitely did. I let the lacquer dry for two days prior to painting. In retrospect, I think that the paint did not stick quite as well as on my test piece, where the lacquer had had many weeks to dry off.

To protect the LEDs from the paint, I used tiny pieces of masking tape. Another way is to cover the LEDs with some grease so that the paint won't stick. I did this with the IR LED and the sensors underneath, because they are installed so deep that tape wouldn't stay on.
The paint I used is Duplicolor synthetic resin enamel. This is the kind you are not supposed to paint over with acrylic lacquer, but acrylic lacquer underneath the paint seemed to work fine. Sanding the lacquer left a nice smooth surface for the paint, so getting a good result was easy.

I painted the windows black by hand. At first I tried to cover the edges with masking tape, but it wouldn't stay very well on the curved surface. I was also a bit worried that the blue paint would come off with the tape because it was not completely dry. Fortunately, my wife happened to have a tiny paintbrush, with which it was really easy to accurately paint the windows.
Finishing touches

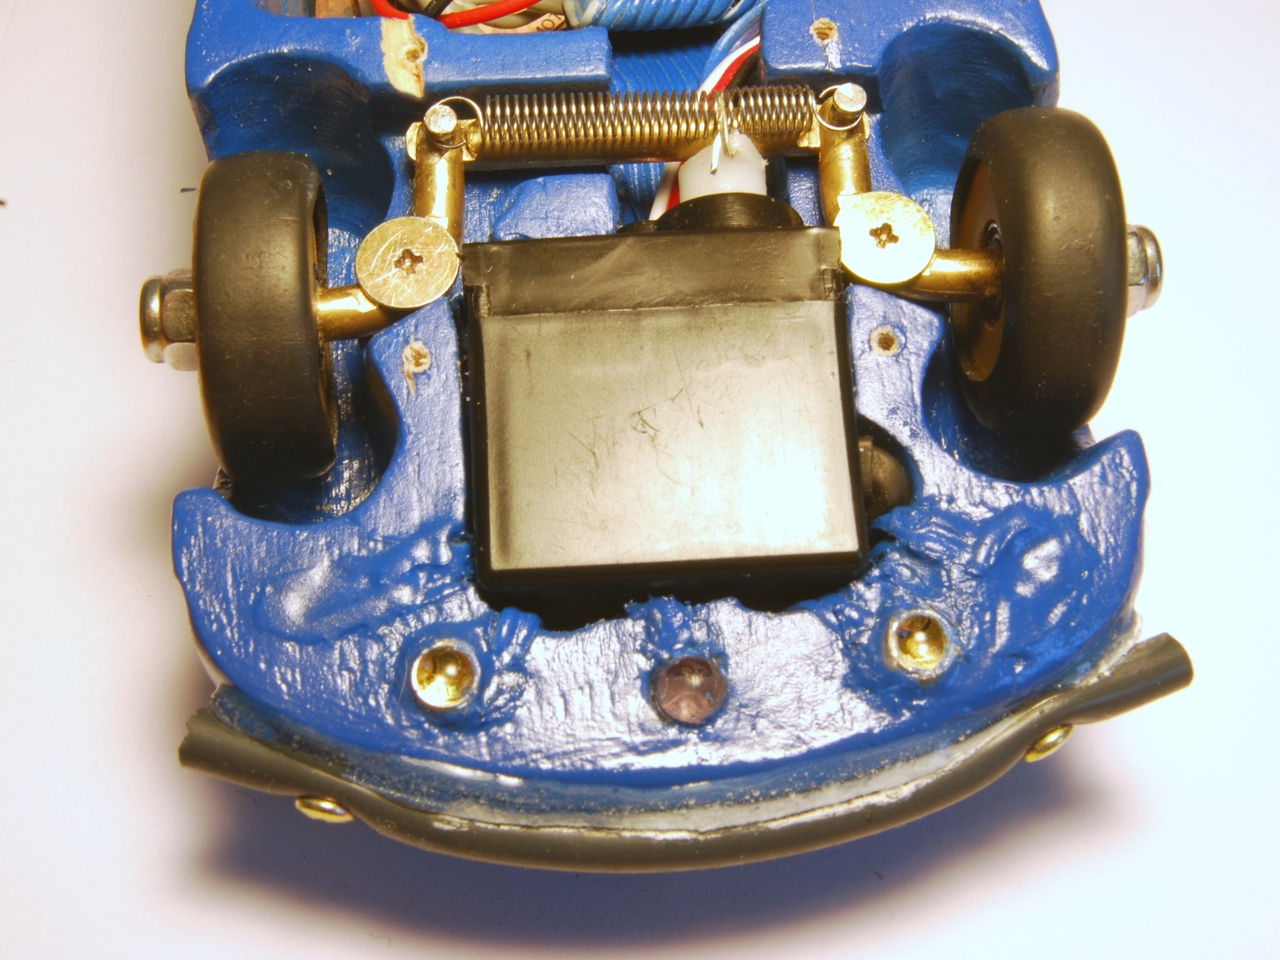
I made bumpers from black rubber tube from a Lego pneumatics set. The bumpers are held in place by just two screws, as epoxy glue would not stick to the rubber. This has the downside that the bumper would come off easily if someone was to pull from the middle.
The Volkswagen logo on the hood is made of 1 mm thick aluminum. I tried to etch the pattern, but the aluminum did not etch very well with the sodium persulphate that I use for etching PCBs.
I ended up carving the logo by hand, first drawing lines with knife and then routing with the V-shaped Dremel 125 bit. You can also easily carve aluminum with just a knife.
I used the same blue paint for the logo, but had some trouble with the paint not sticking to metal without a primer. Therefore after sanding (to bring out the pattern), I covered the disc with the acrylic lacquer to keep the paint on. I had to make a few takes at this, because at first I used nail polish which contains aceton, and obviously does not play nice with paint.
Afterthoughts
Shaping the wood took ages! On the other hand, the result is quite nice looking. I think the paint would look even better if I had allowed the lacquer to dry completely before painting.
The car looks somewhat like the Volkswagen New Beetle, which was my inspiration. I never aimed to make a scale model, though, and had to sacrifice some of the form to leave enough space for the parts.
– Petteri Aimonen on 17.7.2010