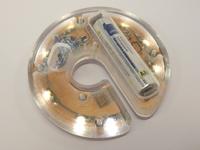
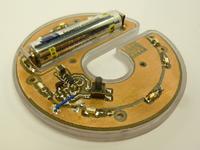
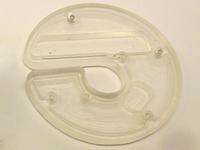
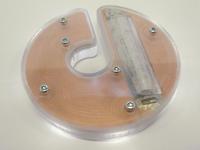
Led lamp for kid's hat

It's the dark season again, and time to plaster our child's clothing with reflectors and lights in an effort to increase safety. Hats with front lamps are a thing, and headlamps exist also, but neither seems to work that well for making a kid visible from any direction. So it was time to make my own.
Circuit

I chose to run the LEDs on a single AAA battery to keep the weight down. To step up the voltage I'm using MCP1640 synchronous boost chip. Because MCP1640 fully disconnects the output when off, it is possible to use it also as the main power switch. When in standby, MCP1640 itself takes less than 1µA of current.

The Q1 transistor and the capacitors and resistors around it implement a simple soft on-off pushbutton functionality. A short press of SW1 will give a 100 ms pulse through C3 to the enable pin. This turns on the MCP1640, and R9 will then keep enable pin high.
A long press of SW1 will charge up C4 through R10. This takes about 1 second, after which Q1 will pull down the enable pin and turn off the power. R15 is needed to ensure that the C2 output capacitor empties before C4 does.
A side benefit of this scheme is that if the lamp is in a pocket or bag and gets accidentally pressed, the press is usually long enough that it doesn't actually turn it on. On the other hand there is a defiency where below 0.6 V battery voltage, the light continues to operate but can no longer be turned off. But an alkaline battery is mostly used up at that point, so it might be considered a low battery indication feature.
The circuit is simple enough that it fits on a single-layer PCB with only a single jumper. I milled the PCB using a CNC router, but you could also just order it. Or alternatively, etch it, but getting the outline shape exact is quite important for a good fit in the enclosure.
Enclosure


The enclosure is designed to wrap around the tuft ball commonly found on kid's woolly hats. It has a 5 mm gap that is wide enough to slide in, but tight enough to stay in place.
I made the enclosure out of plastic on CNC3020 router. The top part is made out of 8 mm acrylic and the bottom part out of 4 mm polycarbonate, giving 12 mm total which is just enough for the 10.5 mm wide battery. An alternative would be to 3D print it out of translucent filament.
The plastic is cut to 0.5 mm thick around the power button, making it flexible enough to press the power button through it.
The screws are 10 mm long 1.8 mm diameter screws I had from another project.
I applied protective lacquer to the PCB to give it some basic protection against water. I also greased one side of the enclosure and applied silicone to the other side before screwing it closed. If I'm lucky, the silicone will eventually cure as a thin strip of sealant that will stay in place when I open the enclosure to change the battery.
Does it work?

Visibility is pretty good from any direction. Having the lamp up high is great for being visible behind bushes and other obstacles.
I selected the resistors to give 3 mA current for each of the 8 LEDs, 24 mA total. Out of the 1.5 V battery and with switching losses this gives about 60 mA. This should give about 20 hours use time with a single battery.
From close range the LEDs feel a bit too bright, so I may end up trying to diffuse the beams a bit. Sanding the inside of the enclosure might work, or I might install some diffusor film taken from an old TFT screen.
The KiCAD files for the PCB and SVG drawing of the enclosure are available here.
– Petteri Aimonen on 24.10.2021
